
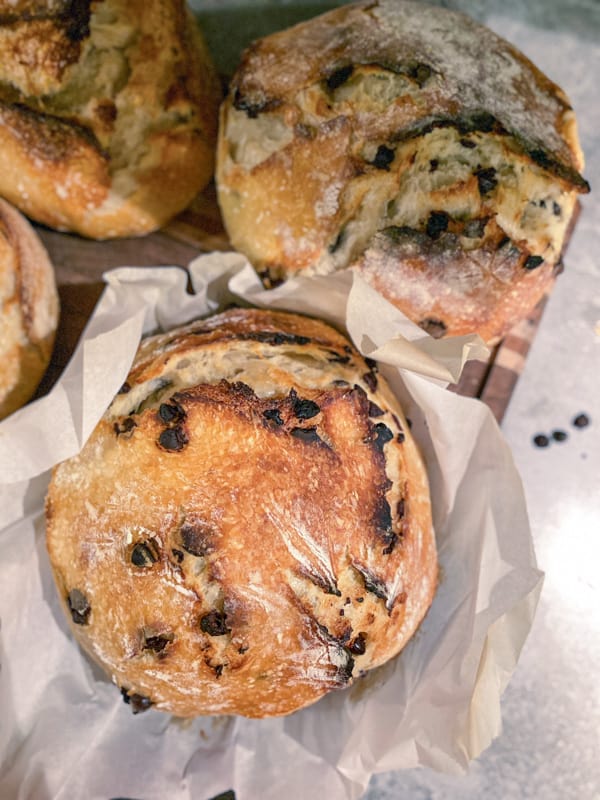
Chocolate Chip Sourdough Bread
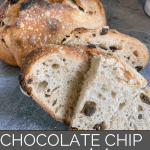
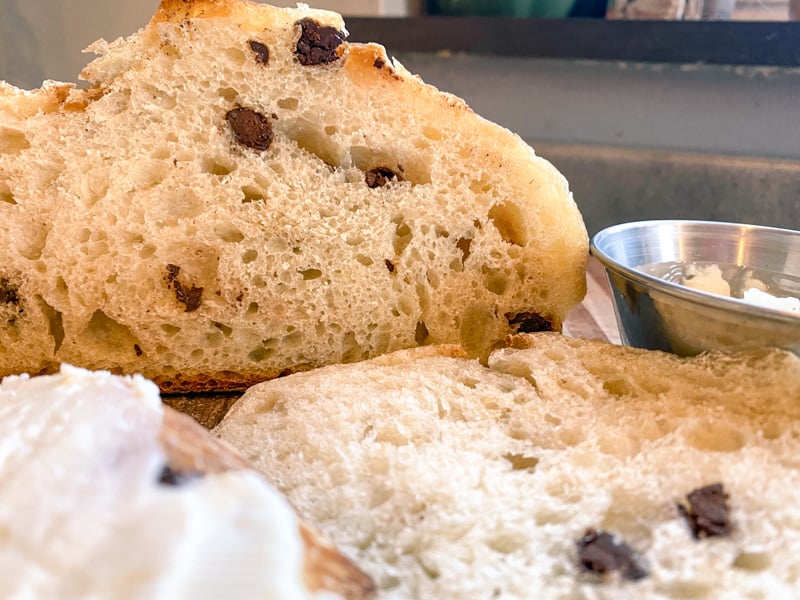
Chocolate chip sourdough bread is soft, chewy, and delicious. It has a subtle sweetness that pairs beautifully with a rich cup of coffee or a creamy spread.
I honestly don’t remember where I got the inspiration for this recipe, although I’ve been making rustic sourdough loaves for some time now. Occasionally I like to add mix-ins like garlic and herbs or jalapeños and cheese. But I feel like the addition of sweet chocolate chips is pretty unique.
I have also experimented with a sourdough chocolate bread that uses both cocoa powder and chocolate chips (maybe I’ll post my own recipe eventually!). But, I really do prefer this plain and simple chocolate chip loaf.
So, yes. This bread is pretty special. It makes a great breakfast bread, a special peanut butter sandwich (which my kids appreciate), or a fun party tray addition.
This post contains affiliate links, which means I may make a small commission at no extra cost to you. See my full disclosure here.
Prepping Your Sourdough Starter
You must have a bubbly and active sourdough starter before making this chocolate chip sourdough bread. If the starter is flat (at the “discard” stage, in other words), then it the yeasts are not active. And no yeast means no rise to your bread. Starter discard works fine for quick breads (like banana bread), but it will not work in this airy chocolate chip bread recipe.
Here are my tricks to help you get your own sourdough starter to peak activity:
- Feed your starter consistently (every 12-24 hours) for a few days before baking bread with it.
- Always feed at least an amount equal to the starter you have on hand. This means that if you have about 1 cup of starter, stir in at least 1 cup of water and 1 cup of flour per feeding. (By the way, if you end up with excess starter after going through this process, you can always make the recipes in my Sourdough Discard Favorites ebook!)
- Keep an eye on your starter 4-8 hours after feeding. This is when I find mine is the most active. Make sure you see lots of bubbles. I like to test if the starter is active by dropping a tablespoon in a glass of water and seeing if it floats to the top. If it does, then it should be ready for bread making.
Tools To Make Chocolate Chip Sourdough Bread
There are a few tools that make the process of baking delicious sourdough bread easier. If you have these things on hand, it’s more likely that you’ll come out with a beautiful loaf of chocolate chip sourdough bread. Here’s the list:
If you don’t have these things though, that’s okay! Don’t be afraid to use a bowl (or some other vessel) instead of a basket. No bench scraper? Use a spoon or spatula to scoop out dough and use a little extra flour on the counter when shaping loaves.
I baked bread for a long time without using a thermometer to check the internal temperature. Once I did though, my loaves started coming out more consistent. The thermometer linked above is the one I have and I highly recommend it. It’s inexpensive and can be used for a lot more than just baking bread. I’ve also used it to make candy, check the temp of my frying oil, and make cheese from our raw milk!
A sharp paring knife can be used to do simple scoring as opposed to a fancy razor. Hey, it’s good to be resourceful. 😉
Chocolate Chip Sourdough Bread Baking Methods
Many sourdough bakers swear by using a kitchen scale to measure ingredients. I have a confession: I don’t usually use one. It’s not that I’m against it, but I’ve made my basic rustic sourdough bread recipe using standard measurements countless times. And I’ve found that it is very forgiving. So, since this chocolate chip sourdough bread is based off my basic recipe, I am giving simple measurements instead of weight in grams.
I do recommend sticking with the stretch-and-fold method. If you don’t want to do intervals of stretch-and-folds, you can just knead in a stand mixer for 10-15 minutes. I’ve done that, but the texture of this particular bread comes out more dense and not airy/fluffy. I believe it has something to do with the addition of sugar, because when I make my regular loaves, using a stand mixer doesn’t affect the texture as much.
If you aren’t familiar with stretch and folds, it’s just what it sounds like. You take your dough and stretch it upwards and outwards. Then, you fold it over onto itself. Turn the bowl a quarter turn 4 times and repeat. This is considered one set of stretch and folds. Then the process is repeated every 15-30 minutes. The stretch and folds help develop the gluten in the bread, as well as give it a better rise and oven spring.
I stretch and fold every 15 minutes for the first 3 rounds, then every 30 minutes for the last 3.
Baker’s Timelines
Sample Timeline 1
Feeding your starter early in the morning gets the entire mixing, rising, and shaping process out of the way in 1 day. Alternatively, you can let the dough bulk ferment over night and shape the next day. Just remember that the time it takes for your starter to reach its peak can vary, based on its maturity and temperature of your house. Mine takes around 5 hours to reach its peak in a kitchen that’s between 68-70 degrees F.
Day 1:
- 8:30AM: Feed starter
- 1:30 PM: Mix dough
- 2PM: Stretch and fold round 1
- 2:15PM: Stretch and fold round 2
- 2:30PM: Stretch and fold round 3
- 3PM: Stretch and fold round 4
- 3:30PM: Stretch and fold round 5
- 4PM: Stretch and fold round 6
- 4-10PM: Bulk ferment
- 10PM: Divide and shape, place in floured baskets/bowls and leave in fridge overnight or up to 4 days
Day 2, 3, 4: Bake when you’re ready!
Alternatively, you can feed your starter around lunch time, let your dough bulk ferment overnight, and shape your loaves first thing in the morning.
Day 1:
- 12:45PM: Feed starter
- 6PM: Mix dough
- 6:15PM: Stretch and fold round 1
- 6:30PM: Stretch and fold round 2
- 6:45PM: Stretch and fold round 3
- 7:15PM: Stretch and fold round 4
- 7:45PM: Stretch and fold round 5
- 8:15PM: Stretch and fold round 6
- 8:15PM-7AMish next morning: Bulk ferment
Day 2:
- 7AM: Divide and shape, place in floured baskets/bowls and leave in fridge to cold ferment at least 15-18 hours.
On Day 3, 4, or 5: Score and bake
How To Make Chocolate Chip Sourdough Bread
Start by measuring the bread flour into a large bowl. You can substitute some of all of the flour with all-purpose flour, if you want. I just find that the results are more consistent and the dough is easier to work with when I use bread flour.
Next, add water and sourdough starter. For the best results, allow the mixture to autolyse for up to 30 minutes before adding salt and sugar. However, I often skip this process if I’m in a hurry and my loaves still turn out light and fluffy!
Add sea salt and sugar, then mix into a shaggy dough. You can do this with a wooden spoon or with clean hands, just be aware that it does get sticky. I actually find my hands to be easier. You could also use the dough hook of a stand mixer just enough to pull the dough together.
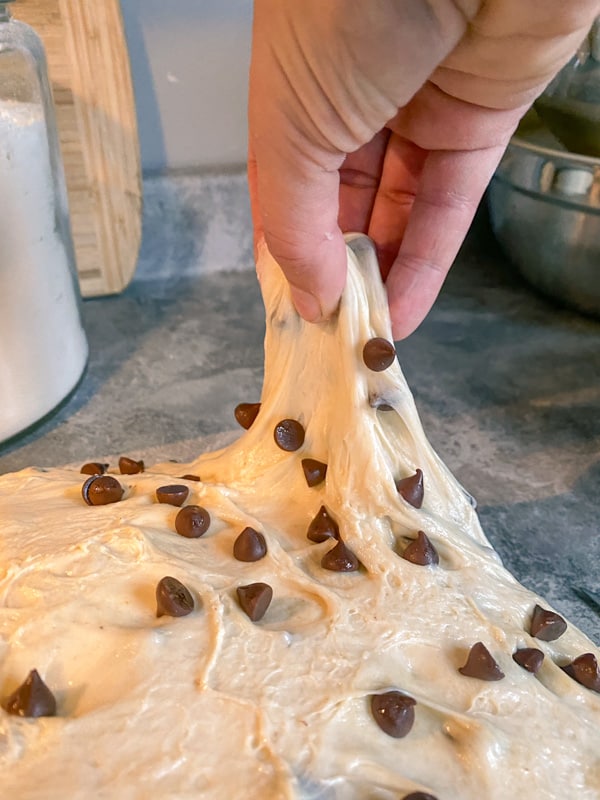
Let the dough rest for about 15 minutes, then add the chocolate chips right before the first set of stretch and folds. Feel free to use either semi-sweet chocolate chips or dark chocolate chips. The process of stretching and folding does a great job of mixing the chocolate chips right in.
Again, the stretch and folds should be at these intervals (or close to): the first three rounds every 15 minutes, and the last three every 30 minutes.
Cover the dough with a damp towel between stretch and folds. Then, cover with a lid or plastic wrap before beginning the bulk rise.
Allow the dough go through bulk fermentation (first rise) at room temperature for 6-12 hours. The amount of time you let the dough rise will largely depend on the temperature of your kitchen. If your kitchen stays quite warm, 12 hours may be too long.
Shaping and cold fermenting
After the dough has bulk fermented, use a bench scraper to turn it out onto a lightly floured surface. Take one side of the dough at a time and fold it into itself. After doing this on four equal corners, turn the dough over so the folds are on the bottom. Roll it around with your hands using a clockwise motion, tucking more of it under as needed.
Once I have my dough in a round shape, I like to place it as far away from me on the counter as I can. Then, I gently roll it towards me until it’s almost to the edge of the work surface. This helps develop surface tension, which will give a prettier loaf.
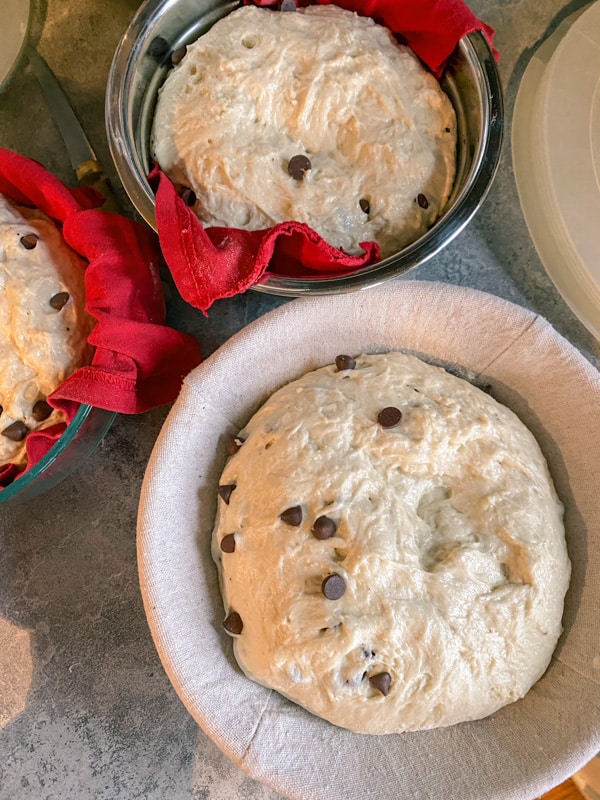
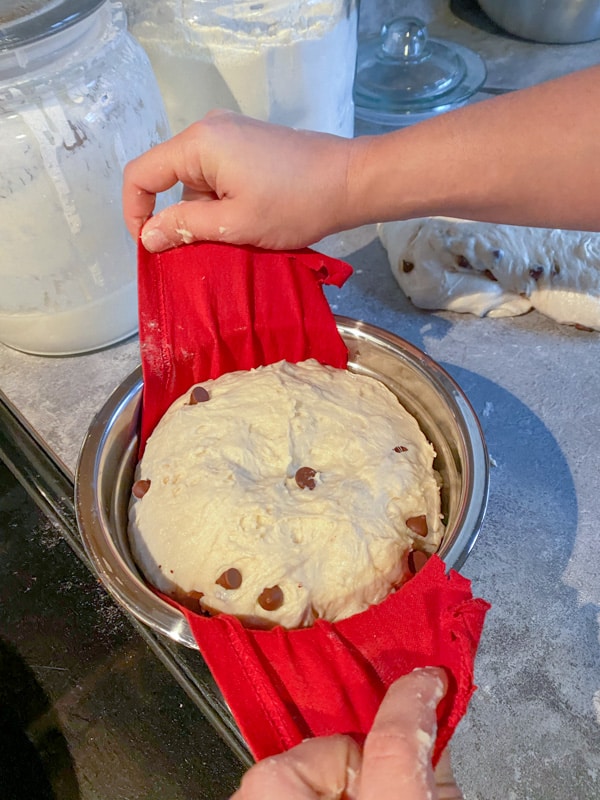
Now that the dough is shaped, place it face down in a floured proofing basket or bowl. Cover with plastic wrap, a lid, or a plastic grocery bag depending on what vessel you chose. Place it in the fridge to cold ferment for 15-18 hours.
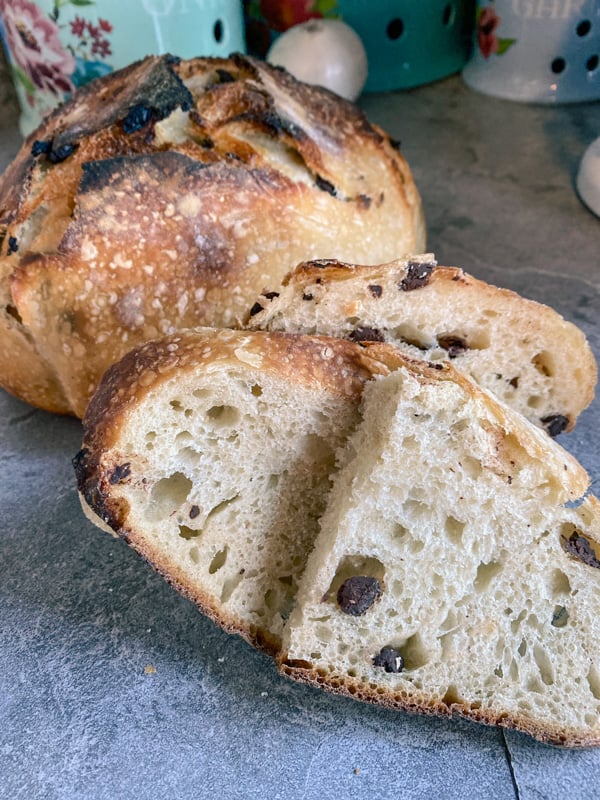
When it’s time to bake, remove the dough from the fridge and turn it out on a piece of parchment paper, seam side down. Do a gentle reshape if necessary. I also like to make sure all the chocolate chips are tucked inside the bread dough. If they’re sticking out too much, they usually scorch. It’s not that big of a deal, but it does make sure you’re getting as much yummy chocolate inside your bread as possible!
You can dust the top with a little more flour if you want a more pronounced scoring pattern on top. To score the top of the dough, use a lame, razor, or sharp knife. I tend to stick to simple sourdough scores, but feel free to get as fancy as you want.
How To Bake Chocolate Chip Sourdough Bread
To prevent over browning on the bottom of the loaf, sprinkle a layer of rice on the bottom of your dutch oven. Lower the dough (still on the the parchment paper) inside. Cover and bake at 450°F for 30 minutes, then uncover and bake another 20 minutes.

After the full 50 minutes, use a kitchen thermometer to make sure the bread is done. The internal temperature should be at least 190°F. If it isn’t, put the lid back on and bake another 3-5 minutes and check again.
Remove from dutch oven and cool on a cutting board or wire rack for at least 1 hour before cutting.
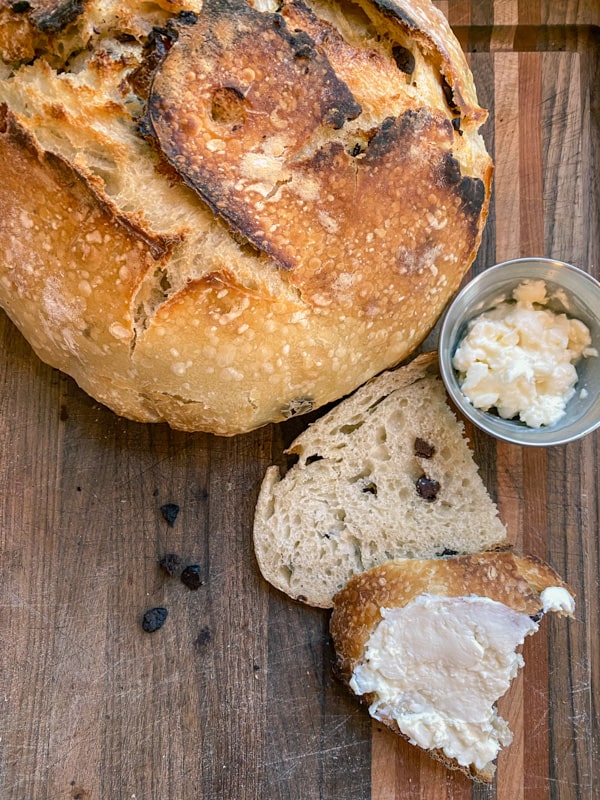
And now it’s time to enjoy! I think the best way to serve this delicious bread is topped with cream cheese and honey. Of course, good old butter pairs nicely as well.
Please, if you liked this recipe, leave a quick comment and rate it 5 stars below.
Need more chocolate? Try making this easy, popular Dark Chocolate Salted Pretzel Bark!
Interested in sourdough discard recipes? Go grab my Sourdough Discard Favorites Ebook for free!

Tiffany is a mama to four boys, second generation homeschooler, and college graduate with degrees in both music and business. Now, she is a natural living and homestead enthusiast who loves gardening and raising chickens, pigs, and cows. A lifelong believer in Jesus, she has a burning desire to bring Him glory in everything she does. A worship leader and musician, she also loves to write songs and play the piano in what spare time she finds.

Chocolate Chip Sourdough Bread
Ingredients
- 3 3/4 cups bread flour
- 1 1/2 cups water
- 1/2 cup sourdough starter active and bubbly
- 1/3 cup sugar up to 1/2 cup if you want sweeter bread
- 2 tsp sea salt
- 1/2 cup dark or semi-sweet chocolate chips
Instructions
- OPTIONAL BUT RECOMMENDED: Combine flour, water, and sourdough stater in large bowl and let sit for 30 minutes to autolyse.
- Add salt and sugar, then mix into a shaggy dough using your hands, a wooden spoon, or the dough hook of a stand mixer.
- Let the dough rest for about 15 minutes, then add the chocolate chips before starting the first set of stretch-and-folds.
- Complete 1 set of stretch-and-folds by grabbing one edge of the dough and firmly pulling up as far as you can without the dough breaking, then folding it over. Turn the bowl a quarter turn and repeat until you've gone all the way around. Repeat this process every 15 minutes for 3 rounds, covering with a damp towel in between rounds. Then repeat every 30 minutes for another 3 rounds.
- Cover the bowl with plastic wrap and let dough bulk ferment for 6-12 hours until it has at least doubled in size.
- After the dough has bulk fermented, use a bench scraper to turn it out onto a lightly floured surface. Take one side of the dough at a time and fold it into itself. After doing this on four equal corners, turn the dough over so the folds are on the bottom. Roll it around with your hands using a clockwise motion, tucking more of it under as needed, until the dough is shaped into a nice round loaf.
- Place the dough face down in a lightly floured proofing basket or bowl. Cover with plastic wrap or a lid and and place in the refrigerator to cold ferment for 12-36 hours depending on when you want to bake and how sour you like your bread.
- Remove the dough from the fridge and turn it out on a piece of parchment paper, seam side down. Do a gentle reshape if necessary. Dust the top with a little bit of flour and score using a razor or sharp knife.
- To prevent over browning on the bottom of the loaf, sprinkle a layer of rice on the bottom of your dutch oven. If you don't want to do rice, try doubling the parchment paper and placing a baking sheet on the bottom rack of the oven. Lower the dough (still on the the parchment paper) inside a dutch oven. Cover with a lid and bake at 450°F for 30 minutes, then uncover and bake another 20 minutes until the internal temperature is 190°F.


I APPRECIATE you including time lines . Thats very helpful
Looks delicious, Thank you!!
Even though I am not a big fan of “sweet” bread, your recipe now has me wanting to try this sourdough chocolate bread!
Oh wow, my kids would love this… two of our favorite things, sourdough bread and chocolate chips! definitely saving this to try!
The timelines were very helpful, thank you! Scoring scares me but loved thst section. Bread making is a labor of love! Tha k you for this yummy recipe!
Hi friends! Thanks for stopping by! Be sure to rate this recipe if you give it a try.
Thank you for fabulous recipe! I’m relatively new to sourdough bread making, but the result from this recipe could have been found in a Parisian bakery. I impressed myself and, more importantly, my family. Lol!
I’m so glad you enjoyed it!